

Welcome to the heart of effective email marketing with MailOptimal! If you're looking to elevate your outreach while keeping your sender reputation spotless, the Campaign Settings section is your command center. Tucked away in the settings of each email account on the dashboard, this feature lets you fine-tune how your campaign emails are dispatched—ensuring they feel natural, timely, and engaging. Whether you're nurturing leads, promoting products, or building relationships, these settings help you send smarter, not harder.
No tech jargon overload—just clear steps to get you up and running. Let's dive in!
Why Campaign Settings Matter: Your Path to Inbox Success
Before we get hands-on, a quick note on the magic here. Email service providers (like Gmail or Outlook) love patterns that mimic real human conversations. Campaign Settings in MailOptimal automate this by controlling volume, timing, and scheduling. Result? Higher deliverability, better open rates, and fewer trips to the spam folder. It's like giving your emails a VIP pass to the inbox.
Step 1: Navigating to Campaign Settings
- Spot Your Email Accounts: On the main dashboard, you'll see a clean list of your connected email accounts as handy cards. Each one shows quick stats like warmup status and daily sends.
- Click into an Account: Tap the card for the email you want to tweak. This opens a detailed view with tabs at the top.
- Head to Settings: Switch to the Settings tab. It's your customization hub! Scroll down a bit—you'll land on the Campaign Settings panel. It pops up as a neat, organized form with fields for daily limits, intervals, and more.
Step 2: Configuring Your Campaign Settings – Field by Field
This section is all about balance: enough emails to grow your reach, but paced to build trust. MailOptimal's recommendations are gold—start there and adjust as you go. Here's the breakdown:
Daily Campaign Volume: Set Your Sending Pace
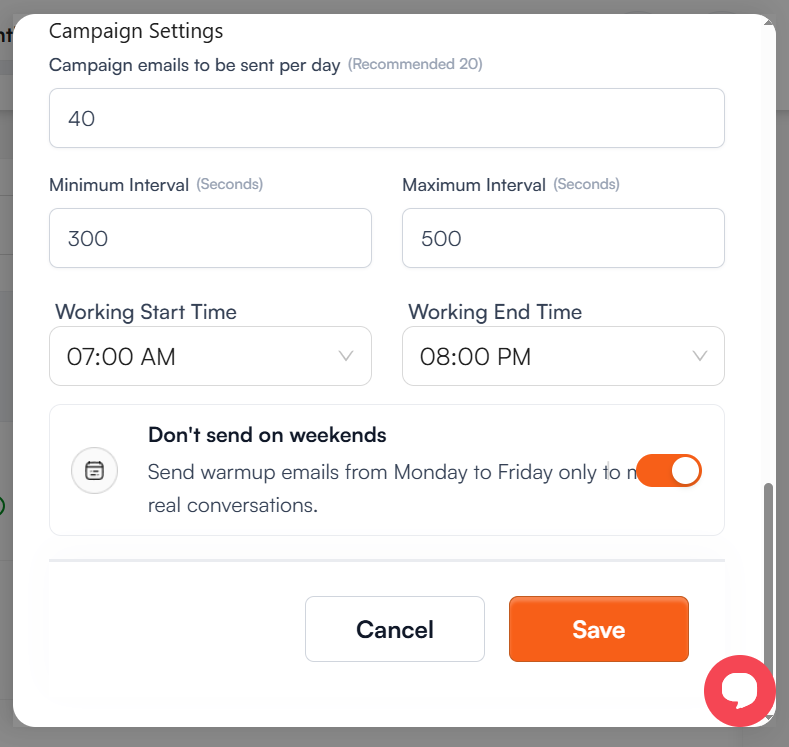
- Campaign Emails to Be Sent Per Day (Recommended: 20)
- This is your daily quota for campaign-specific emails. In the example setup, it's dialed up to 40—great for scaling teams!
- How to Set It: Enter a number in the field. Start low if your account is new (e.g., 10–20) to warm up gently, then ramp up as replies roll in. Why? It prevents overload and keeps your deliverability humming above 95%.
Sending Intervals: Add a Human Touch with Random Pauses
Emails sent in rapid-fire bursts? That's a spam red flag. These settings introduce smart delays for a more organic flow.
Minimum Interval (Seconds) (Default: 300)The shortest wait between sends—think 5 minutes (300 seconds in the screenshot). This ensures no back-to-back blasts.
Maximum Interval (Seconds) (Default: 500)The longest pause—about 8 minutes (500 seconds here). MailOptimal randomizes between min and max, so your sends feel delightfully unpredictable (just like real life).
Working Hours: Time It Right for Maximum Impact
Align your sends with when your audience is most receptive—typically business hours.
Working Start Time (Default: 07:00 AM)Kick off sends at the beginning of your day (e.g., 07:00 AM). Use the dropdown to pick your ideal start.
Working End Time (Default: 08:00 PM)Wrap up by evening (08:00 PM shown). Again, dropdown magic for easy selection.
Weekend Warrior? (Or Rest Mode?)
Don't Send on Weekends Toggle this on. The helpful tooltip reads: "Send warmup emails from Monday to Friday only to mimic real conversations."
Why Enable It? Weekends often mean lower engagement and higher ignore rates. Pausing here keeps your account looking authentically professional—sends only when it counts.
Hit SAVE, That's all !